I saw that AliExpress had tiny OLED displays for just a few bucks, so I decided to order a few and figured that I would find a use for them. I haven’t found a use for them yet, but I figured I should go ahead and document what I did.
Here’s what you will need:
- Wemos D1 Mini | AliExpress
- MicroUSB Cable and Charger for Wemos
- .96″ OLED | AliExpress
- Dupont jumpers | AliExpress
- Electronic Project Case (Optional)
- Arduino IDE
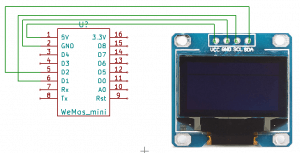
Wiring it up was easy. I had already soldered header pins onto the Wemos and the OLED already had a header, so I just had to connect 4 jumper wires. The schematic below shows how you need to wire it up. Keep in mind that you can connect to 3v3 if you need to. The OLED will work on voltage ranging from 3v to 5v.

I also learned that you can get OLED displays that need 6 connections. Those use SPI, whereas the one in this post uses I2C. With I2C, you obviously use 2 fewer wires, but it is supposedly slower. I have nothing to compare it to, so I don’t really know how much slower. But it seems to do things fast enough for anything I would expect myself to use it for. So keep that in mind if you are planning on making a video game (Pong?) or something similar out of this.
Next, you need to add the Adafruit libraries to Arduino IDE in order to control the . Open Arduino IDE and click Sketch -> Include Library -> Manage Libraries. Search for Adafruit, and scroll down to the Adafruit Gfx library and install it. Next, scroll down to the Adafruit SSD1306 library and install it.
Next, you can use the following code to output text to the display. This creates a scrolling message:
#include <Adafruit_GFX.h>
#include <Adafruit_SSD1306.h>

#define OLED_RESET 0  // GPIO0
Adafruit_SSD1306 OLED(OLED_RESET);

void setup()   {
  OLED.begin();
  OLED.clearDisplay();

  //Add stuff into the 'display buffer'
  OLED.setTextWrap(false);
  OLED.setTextSize(1);
  OLED.setTextColor(WHITE);
  OLED.setCursor(0,0);
  OLED.println("automatedhome.party");

  OLED.display(); //output 'display buffer' to screen
  OLED.startscrollleft(0x00, 0x0F); //make display scroll
}

void loop() {
}
Slower in terms of I²C can be a point if you output live action mesurements.
Think on a robot in a factory, or even a display in a jet pilots helmet.
milliseconds sometimes do very much count.
anyway, nice tutorial
– numb.3rs
Why my oled are not display anything? Is it because of wrong soldering the oled pin?
Are you using the exact same model as the blog post. Which pins did you solder it to?
Tested, Working Perfect !
Thanks.
Nice work.
Thanks for sharing.
It’s working great.
Nice! Just a quick thought, it would be nice if the wiring diagram used different colors to make it easier to read. I appreciate the simple tutorial!
Yes, I will likely do that in the future. When I put these articles out, I’m usually short on time, so I just try to throw it together quickly.
Nice. But what about further purposes of this? How to connect bme280 press and temp to this project – I mean in terms of coding? And wiring as well?
Any suggestions good people?