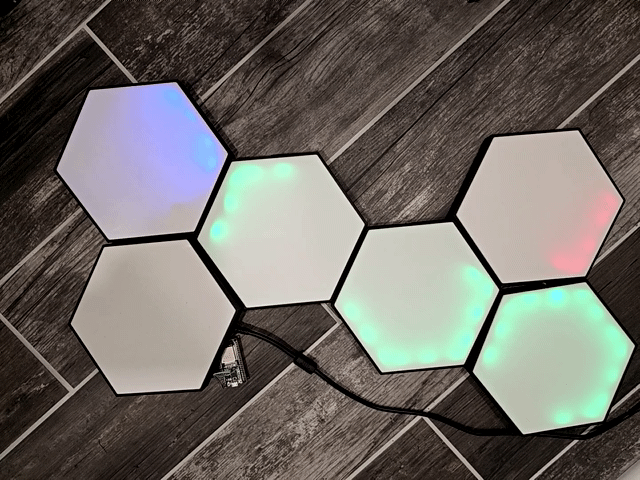
 I wanted a way to be able to easily monitor my 6 3D printers. I thought about mounting a monitor, and just displaying a webpage, but I figured this would give me a much cleaner look on my wall. From the animation above, you can see that one printer is completely off(bottom left), one printer just completed a print, and the bed is about 3/4 of the way to fully cooled(top right), one printer is paused, likely due to filament running out(top left), and the other 3 are currently printing. You can also see the progress of the 3 that are printing. Once the entire hex is full green, that means the print is almost done. This will help me monitor my printers from my office and make more efficient use of printer time so they don’t sit idle for as long.
here’s what you need
- The Hexes Made by DeDane1970 on Thingiverse. There are tons of other options. Just 3D print them the way he says. I made them bigger via my slicer. If you do the same, just increase the XY axis only, not the Z. Just look at the pictures on the Thingiverse post that explains that you should map it out first so you know which ones to print. However, the way I did it was to start the strip in the middle of one of the connecting holes, and went all the way around the hex before moving on to the next hex.
- Home Assistant I installed it on this MiniPC. Faster than a Pi, but it just costs around the same when you include the huge markups on Pi’s, and the cost of a power adapter/case/SD card, etc. I’ll have to see how long the eMMC holds up, but I will probably get a cheap SSD.
- WLED I installed it on an ESP32. But you can apparently purchase LED controllers that already have WLED. I used this power supply to power the ESP32 and this LED strip. You will also need some wire to connect the strips between the hexes.
- Of course, your printers also need to be running Klipper/Moonraker. The easiest way to install those is to use kiauh
WLED
I’m not going to go into any sort of detail on this because I already have a blog post on WLED, and there are tons of articles and videos that are better than that. If you purchase from the links above, it’s really easy to put it together. You just need to do a little bit of soldering.
The main thing is that if you get a really dense LED strip, you need to consider a bigger power supply, and you will need to inject power in multiple places. I don’t have enough LEDs in the strip so I don’t really have to worry about that. And also keep in mind that you might now have something like this at full brightness, so you might not need a power supply to push the amps needed for full brightness.
Just measure how long you need each strip to fit around each hex, and cut them, and connect them with the 3-wire and solder it into place, and stick the LED’s in there.
In the WLED web interface, click ‘Add Segment’, and create your segments based on which LEDs are in each hex. The numbering is a little odd, but nothing you can’t figure out by just messing with it. For me, I had 17 LEDs in each segment. So the first segment was for LEDs 0-17, the second was 17-34, then 34-51, and so on. To me it seemed that this method would overlap, but that’s how it works.
Home assistant
Again, I’m not going to discuss much about installing Home Assistant. It’s not hard, and there are a lot of tutorials out there in any format you prefer.
The main thing here is to install the Moonraker integration, and then add your printers. First you need to install HACS(this link tells you how to do that). This is an add-on for Home Assistant that allows you to add integrations that aren’t included with HA. After you install HACS, search for Moonraker, and install it. Then, in HA, go to Settings -> Devices -> Add Integration, and add the Moonraker integration, and point it to your printer IP. Then repeat that for all your printers.
The automation
This is the reason most people would even need this article since everything else I’ve discussed so far is easy and many others have written about those things and made videos. The automation took me a good bit of time to setup. This is where Home Assistant grabs the information from Moonraker and makes the decisions on how to pass that information on to WLED. To keep it easy to pull it into Home Assistant, I’m going to post the YAML code, and you can copy that into the automation, and change the entities, and I’ll add comments into the code to explain what it does.
To import it into Home Assistant, go to Settings -> Automations -> Create Automation. Click the menu at the top right and click “Edit in YAML” and paste this code in there and make all the changes to point it to your entities. Keep in mind that you might need to remove some of the IF statements, where I’m checking if my room lights are on, etc.
I really feel like this automation could be made simpler and more efficient, but I just don’t know how. If you are able to do that PLEASE let me know what you did.
alias: ControlPrinterHexWLED
description: ""
#AAAAAA Each 'platform' here is something that can trigger the automation. So it triggers every 3 minutes, or when either of those 2 lights are turned on, or if the printers change to printing or to paused.
trigger:
  - platform: time_pattern
    minutes: /3
  - platform: state
    entity_id:
      - light.office_lights
      - switch.basement_stairs
    to: "on"
  - platform: state
    entity_id:
      - sensor.coreception_current_print_state
      - sensor.elf_current_print_state
      - sensor.elrond_current_print_state
      - sensor.dobby_current_print_state
      - sensor.ender5_current_print_state
      - sensor.voron_current_print_state
    to: printing
  - platform: state
    entity_id:
      - sensor.coreception_current_print_state
      - sensor.elf_current_print_state
      - sensor.elrond_current_print_state
      - sensor.dobby_current_print_state
      - sensor.ender5_current_print_state
      - sensor.voron_current_print_state
    to: paused
#/AAAAAA
#BBBBBB IF both of my lights are off for 5 minutes, then turn the WLED off. This might not be useful to anyone else, but for me I'm only in that room if one of those lights are one,
#so that's the only time I have the WLED on.
condition: []
action:
  - if:
      - condition: and
        conditions:
          - condition: state
            entity_id: light.office_lights
            state: "off"
            for:
              hours: 0
              minutes: 5
              seconds: 0
          - condition: state
            entity_id: switch.basement_stairs
            state: "off"
            for:
              hours: 0
              minutes: 5
              seconds: 0
        alias: Check Stairs/Office Status
    then:
      - service: light.turn_off
        data: {}
        target:
          entity_id:
            - light.wled_segment_1
            - light.wled_segment_3
            - light.wled_segment_2
            - light.wled_segment_4
            - light.wled
            - light.wled_segment_5
        alias: Turn off WLED
#/BBBBBB
#CCCCCC This section is for the first printer. If it's printing, turn the WLED segment for it on.
    else:
#Check if the printer is printing
      - if:
          - condition: state
            entity_id: sensor.ender5_current_print_state
            state: printing
#If it's printing, then turn on the light to green. Set the WLED effect to 'percent', and set brightness to 40%
        then:
          - service: light.turn_on
            data:
              rgb_color:
                - 0
                - 255
                - 0
              brightness_pct: 40
              effect: percent
            target:
              entity_id: light.wled
          - service: number.set_value
            data:
#This sets the percent to light up the WLED to 7, or the actual percentage the print has complete, whichever is higher. That way, if the print is running, at least 1 LED will be lit up.
#You may want to adjust the '7' depending on how many LED's you have in a segment
              value: "{{ [7, states('sensor.ender5_progress') | float]|max }}" #This sets the percent to light up the WLED to 7, or the actual percentage the print has complete
            target:
              entity_id: number.wled_intensity
#If the printer isn't printing, but is 'ready', set WLED to red then we set the WLED percent to reflect the temperature of the bed. If it's below 40C(you can adjust this), then the percentage would be set to 0. If it's
#higher than 40, light up the segment accordingly. If it's 65 or higher, all the LED's would be lit up.
        else:
          - if:
              - condition: state
                entity_id: sensor.ender5_printer_state
                state: ready
            then:
              - service: light.turn_on
                data:
                  rgb_color:
                    - 255
                    - 0
                    - 0
                  brightness_pct: 40
                  effect: percent
                target:
                  entity_id: light.wled
              - service: number.set_value
                data:
                  value: >-
#change the '40' here if you want to adjust the min temp where the LEDs light up for a warm bed(with the printer not printing). That '40' plus the '25' is the temperature where all the LED are lit.
#Change the '25' to adjust that
                    {{ [0, (states('sensor.ender5_bed_temperature') | float - 40)*100/25]|max }}
                target:
                  entity_id: number.wled_intensity
#If the printer is paused, then just turn on the chase effect with a blue color. This effect just has a few LED's that go around the hex.
              - if:
                  - condition: state
                    entity_id: sensor.ender5_current_print_state
                    state: paused
                then:
                  - service: light.turn_on
                    data:
                      effect: Chase
                      rgb_color:
                        - 0
                        - 128
                        - 255
                    target:
                      entity_id: light.wled
                  - service: number.set_value
                    data:
                      value: "110"
                    target:
                      entity_id:
                        - number.wled_speed
                        - number.wled_intensity
#Turn off the LED's if the printer isn't on.
            else:
              - service: light.turn_off
                data: {}
                target:
                  entity_id: light.wled
        alias: Set Ender5 WLED
#/CCCCCC
#/DDDDDD This is for the second printer. It's the same as the first. Of course it uses different entity IDs.
      - if:
          - condition: state
            entity_id: sensor.coreception_current_print_state
            state: printing
        then:
          - service: light.turn_on
            data:
              rgb_color:
                - 0
                - 255
                - 0
              brightness_pct: 40
              effect: percent
            target:
              entity_id: light.wled_segment_1
          - service: number.set_value
            data:
              value: "{{ [7, states('sensor.coreception_progress') | float]|max }}"
            target:
              entity_id: number.wled_segment_1_intensity
        else:
          - if:
              - condition: state
                entity_id: sensor.coreception_printer_state
                state: ready
            then:
              - service: light.turn_on
                data:
                  rgb_color:
                    - 255
                    - 0
                    - 0
                  brightness_pct: 40
                  effect: percent
                target:
                  entity_id: light.wled_segment_1
              - service: number.set_value
                data:
                  value: >-
                    {{ [0, (states('sensor.coreception_bed_temperature') | float
                    - 40)*100/25]|max }}
                target:
                  entity_id: number.wled_segment_1_intensity
              - if:
                  - condition: state
                    entity_id: sensor.coreception_current_print_state
                    state: paused
                then:
                  - service: light.turn_on
                    data:
                      effect: Chase
                      rgb_color:
                        - 0
                        - 128
                        - 255
                    target:
                      entity_id: light.wled_segment_1
                  - service: number.set_value
                    data:
                      value: "110"
                    target:
                      entity_id:
                        - number.wled_segment_1_speed
                        - number.wled_segment_1_intensity
            else:
              - service: light.turn_off
                data: {}
                target:
                  entity_id: light.wled_segment_1
        alias: Set Coreception WLED
/DDDDDD

#######################################################
#Here is where the config for my other 4 printers would go. It's just the same as these previous 2, but pointing to different entities.
#######################################################
    alias: Check Stairs/Office Status
mode: single