I wasn’t planning on writing a post on this, but after I spent 4 hours wrapping my head around this and getting it working, I’m hoping this information might be able to help someone else. A while ago, I purchased this TP-Link 3-Way Smart Switch 2-Pack. I purchased them because the TP-Link stuff seems to be reliable, inexpensive, and it works with HomeAssistant. As an added bonus, you CAN use the smart switch on only one side of the circuit, and keep a dumb switch on the other side. You can turn the light on from either end, and the TP-Link will always show the correct status of the light. This allows you to make your 3-way switches smart for a good price since it always comes with a pair of 3-way switches. I wanted to be able to have the light turn on automatically using the Wyze Sense door sensor and a routine via Alexa.
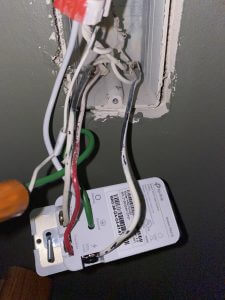
At first I installed the switch in what I thought was the correct way based on how the old dumb 3-way switch was installed, which is pictured below.
The way I wired it cause the light to strobe, and the 3-way basically didn’t work at all. After trying to randomly trying wire it up in different ways, I went out and traced wires and looked up schematics and figured out how to do it.
The Secret
Now I’m guessing that not all houses are wired this way, but if your house is wired similarly to mine, then it should be easy to figure out how to install this. The electrical box for this switch basically has 2 sets of wires: 1) The mains cable that carries the neutral (white), hot (black) wire, and of course the ground(which is usually green or bare) 2) The traveler cable also contains those 3 types of wires, but also contains a red wire.
In the dumb switch, you can see that the black wires from both cables is connected to the dumb switch, along with the red wire. The white wires were connected to each other in a wire nut in the box.
The easiest way to hook up the new smart switch is to simply figure out what the 2 cables. Once you know that, you can see in the picture below exactly how to wire them up.
- The TP-Link has 2 wires coming out of it, and 3 terminals.
- The green wire goes to your ground wire.
- The white wire needs to be put into the wire nut with the other 2 white wires.
- The red wire, and the black wire that is in the same cable as the red wire, goes into the “Traveler” terminals. It doesn’t matter which traveler terminal each go into. They are the same.
- The other black wire goes into the “Line” terminal.
I took pictures that hopefully show all these connections. Both cables come in from the bottom of the box. The traveler cable is on the left side, and the mains cable is on the right. It might be tough to see which one is black since the painters must have sprayed white paint on the wires, but you can see which one is black if you look closely and follow the wires.
Remember to make sure that the bare ground wire isn’t touching any terminals or else your circuit breaker will trip. Afterwards, I tested out every combination of turning it off and on via the app, physical smart switch, and dumb switch, and the light functioned as expected, and the app updated status accurately. Like I said before, I hope this can help someone out. Feel free to ask any questions you may have.


I think you mean to say wire sleeve (or, more accurately, Romex) when you say “cables.”
I meant cable. http://thecircuitdetective.com/glossary.php
There are multiple ways to describe it.