Using WLED and Home Assistant to Monitor 3D Printers via Moonraker/Klipper

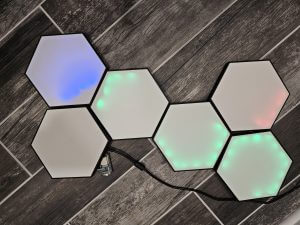
I wanted a way to be able to easily monitor my 6 3D printers. I thought about mounting a monitor, and just displaying a webpage, but I figured this would give me a much cleaner look on my wall. From the animation above, you can see that one printer is completely off(bottom left), one printer just completed a print, and the bed is about 3/4 of the way to fully cooled(top right), one printer is paused, likely due to filament running out(top left), and the other 3 are currently printing.

Replacing a 3-Way Switch with a TP-Link HS-210 3-Way Smart Switch

I wasn’t planning on writing a post on this, but after I spent 4 hours wrapping my head around this and getting it working, I’m hoping this information might be able to help someone else. A while ago, I purchased this TP-Link 3-Way Smart Switch 2-Pack. I purchased them because the TP-Link stuff seems to be reliable, inexpensive, and it works with HomeAssistant. As an added bonus, you CAN use the smart switch on only one side of the circuit, and keep a dumb switch on the other side. You can turn the light on from either end, and the TP-Link will always show the correct status of the light. This allows you to make your 3-way switches smart for a good price since it always comes with a pair of 3-way switches. I wanted to be able to have the light turn on automatically using the Wyze Sense door sensor and a routine via Alexa. Read more...

How I Saved $100 a Month During the Summer With Home Assistant and Smart Thermostats

A while ago, I wrote about installing a smart thermostat followed by a post about pairing them with Home Assistant with a Z-Wave Stick. I didn’t get a chance to mess with it much that summer and I only used it as a dumb thermostat. However, last summer, 2019, I decided to see if I could save a little money by optimizing my cooling schedule. This post talks about the steps I took to do that. Read more...

Easy DIY Fully Addressable RGB LED Strip with ESPHome or WLED

In my last post about flashing a cheap LED controller, I mentioned that method is only really worth it if you already had the strip or the controller already laying around. However, if you wanted an LED strip project from scratch, I would highly recommend that you just create an addressable LED strip. It will cost almost the same, it is actually easier to do, and it will give you a lot more control over the strip. And I don't know if it is the strips that I got, but the color from the addressable strip seems be a lot nicer than the dumb strips from my last post. That could just be because the LEDs are closer together.

Making a Cheap WiFi LED Strip Controller a Lot Smarter

So I had some old LED strips that were hooked up around the window frame in my kid's room which were not doing anything because the old WiFi controller I had on it was just so flaky and it connected via the cloud to, I'm assuming, China. I revisited getting it working, and it turned out that it was using an ESP12 chip. So I figured I should get that going with ESPHome (Check out my previous article about ESPHome) to give me total local control with Home Assistant.

Summoning Actual Fire, or Other Automations, When the Bomb Goes Off in CS:GO via Home Assistant

A few years back, I wrote about integrating my dumb gas fireplace into Home Assistant using a Wemos D1 Mini. A few weeks ago Github user locii created an integration for Home Assistant that lets you integrate the popular PC game, Counter Strike: Global Offensive. So I figured I need to combine these things, and summon fire when the bomb goes off in the game. This article walks you through setting up something like this.

Here's a link to a video of it in action.

Updated FilaWeigher Filament Scale – Now with Temperature, Humidity, Pressure, and MQTT

As I talked about in my last post about the FilaWeigher, I wanted to add MQTT and temperature/humidity(Using the BME280) to that project. Well, I've done that. Refer to the previous post for more details. But now for this one, I'm just going to focus on the updated code and schematics, and the Home Assistant integration via MQTT. I'm going to leave the old post up for the people that don't want MQTT or the BME280 sensor. This version also has JSON output of all the sensors which allows for OctoPrint integration(I actually just finished up that plugin and I'm going to be posting that up soon).

The FilaWeigher – A Standalone WiFi Web Based Weight Sensor for 3D Printer Filament For Less Than $7

I created this project so I can know exactly how much filament is left on a spool for my 3D printer, an Ender 5 I wrote about previously. However, it can very well be used to weigh anything else. I put a few settings that are specific to the filament, but they don't have to be used.

Using a Kindle Fire as a Touch Screen Home Control Panel

Recently, Amazon was selling the refurbished Fire 7 tablet for less than $40. The new one runs for juts $10 more. So I figured I would order it and see if it would be an option. After spending an hour with it, I felt confident that I can make it work. I’ve been running it for a couple weeks at the time of writing, and it’s been awesome.