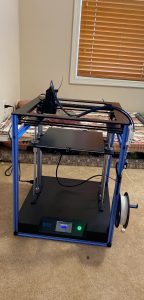
Easy DIY Fully Addressable RGB LED Strip with ESPHome or WLED

In my last post about flashing a cheap LED controller, I mentioned that method is only really worth it if you already had the strip or the controller already laying around. However, if you wanted an LED strip project from scratch, I would highly recommend that you just create an addressable LED strip. It will cost almost the same, it is actually easier to do, and it will give you a lot more control over the strip. And I don't know if it is the strips that I got, but the color from the addressable strip seems be a lot nicer than the dumb strips from my last post. That could just be because the LEDs are closer together.

Making a Cheap WiFi LED Strip Controller a Lot Smarter

So I had some old LED strips that were hooked up around the window frame in my kid's room which were not doing anything because the old WiFi controller I had on it was just so flaky and it connected via the cloud to, I'm assuming, China. I revisited getting it working, and it turned out that it was using an ESP12 chip. So I figured I should get that going with ESPHome (Check out my previous article about ESPHome) to give me total local control with Home Assistant.

Using the WyzeCam as a Webcam for Your Computer or OctoPrint

So if you are looking for a webcam right now (I am writing this article during the COVID-19 pandemic), then you might discover that you are literally going to spend about 3 times the normal price. The Logitech C920 costs $200 right now, and the popular budget C270 will cost you $100.

You can currently get popular WiFi WyzeCam for around $25. And even the pan/tilt version for $35. However, those cams are WiFi only, and won't work out the box with your computer as a webcam for video conferencing(or for OctoPrint, which is what I plan on using it for). However, Wyze recently released a special firmware that allows that function.

Automatically Upload Your Time Lapse videos From OctoPrint to Youtube

For a few months now, I've been looking for a way to upload videos from OctoPrint (This link is to my previous write-up on OctoPrint and its plugins. Please check it out.) to YouTube automatically. I was optimistic when I learned about the OctoPrint-Dropbox-Timelapse plugin, and Zapier, I was optimistic that they would be able to do what I wanted. However, I was not able to get it working. But the OctoPrint-Dropbox plugin had a recent update, and all of a sudden, it all just started working. So I figured there might be others that wanted this, so i did a write-up on it.

Summoning Actual Fire, or Other Automations, When the Bomb Goes Off in CS:GO via Home Assistant

A few years back, I wrote about integrating my dumb gas fireplace into Home Assistant using a Wemos D1 Mini. A few weeks ago Github user locii created an integration for Home Assistant that lets you integrate the popular PC game, Counter Strike: Global Offensive. So I figured I need to combine these things, and summon fire when the bomb goes off in the game. This article walks you through setting up something like this.

Here's a link to a video of it in action.

Setting Up OctoPrint and its Plugins

About 8 months ago I purchased a Creality Ender 5. I wrote a mini getting started guide about it. In that guide, I mentioned OctoPrint, and how I would do a separate write-up on that. I installed OctoPrint after a few prints. I wanted to be able to monitor the prints remotely since the printer is down in the basement. This write-up goes through my setup and settings along with the plugins I used.

Using a Thermal Pad Under a Glass Build Plate on a 3D Printer

I was recently messing around with my Infrared Thermometer to make sure the air coming out of the heating vents was the right temperature. While doing that, I of course had to point it at random things throughout the house, when I finally got to the 3D printer, which was currently running. I figured that would be a good way to verify that the reading on the sensors was close to the IR thermometer. And it was close enough. The glass bed was reading a few degrees cooler, but I figured that was to be expected since the printer sensor is not on top of the glass where I was taking my reading.

Updated FilaWeigher Filament Scale – Now with Temperature, Humidity, Pressure, and MQTT

As I talked about in my last post about the FilaWeigher, I wanted to add MQTT and temperature/humidity(Using the BME280) to that project. Well, I've done that. Refer to the previous post for more details. But now for this one, I'm just going to focus on the updated code and schematics, and the Home Assistant integration via MQTT. I'm going to leave the old post up for the people that don't want MQTT or the BME280 sensor. This version also has JSON output of all the sensors which allows for OctoPrint integration(I actually just finished up that plugin and I'm going to be posting that up soon).

The FilaWeigher – A Standalone WiFi Web Based Weight Sensor for 3D Printer Filament For Less Than $7

I created this project so I can know exactly how much filament is left on a spool for my 3D printer, an Ender 5 I wrote about previously. However, it can very well be used to weigh anything else. I put a few settings that are specific to the filament, but they don't have to be used.

My Experience with My First 3D Printer: a Creality Ender 5 (With Mini Getting Started Guide)

UPDATE: I have written an updated post(1 year later) about this printer. Be sure to read that one after this one as there is some update info in there. Here is the link to it.

About 2 months ago, I decided to finally pull the trigger on purchasing a 3D printer. I settled on the Creality Ender 5. I felt that it struck the right balance between bed size, price, and the community behind it. Although the community isn’t extremely large on its own, I felt that it’s similar enough to the Ender 3 that I should be able to able to figure out any issues by using the same types of advice. I have found that to be accurate for the most part. In addition, it looks like the number of Ender 5 users have increased sharply around the time I bought it. I also liked how it had the 4  vertical rails, which I’m sure gives it a lot more stability. Read more...